Queue Services Overview
Web Services Overview
Email Services Overview
Remote Devices Overview
Queue Services
Please Note:- Ostendo will consume a concurrent user to run Queue Services.
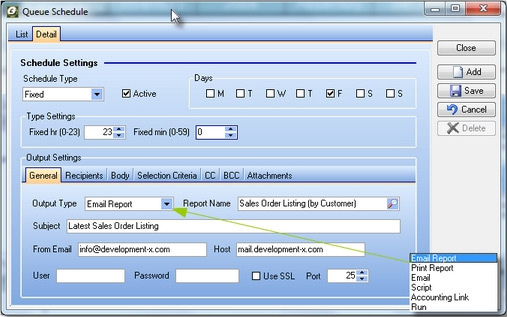
Queue Services is designed to run events (like emailing reports, running the accounting link, executing scripts, etc...) on a fixed or regular basis. The idea is that you can define in the ‘Queue schedule’, the event you wish to run, when and how often, and, so long as the Queue Service is running on the server, those events are executed.

The Output Types (types of events you can run) are:
Run: This option allows the regular/fixed execution of external applications. This is useful for running the Ostendo-MYOB, Ostendo-QB, or the Ostendo-Evolution links automatically – note that you need to pass a command line parameter ‘background’ for the programs to run in non visual mode. See the image below:

Using Events with Queue Services
There are numerous times when changes in the database require further action (i.e. email the Customer when a Sales Delivery has been shipped, email the Sales Manager if an order is greater than a certain value or margin, email the Project Manager if the job/project is going off track, etc...). To accommodate this there is a table called ‘OUTPUTQUEUE’ which can written too (via say a Database Trigger) when that event occurs, and the Queue Service will then action the request.
Please Note:- Ostendo will consume a concurrent user to run Web Services. One concurrent user will give you 10 access users for CRM email outlook integration, mobile queries, remote connection for data entry, remote enquiry or query, etc
Web Services, Mobility, Remote Access and Third Party Software Integration
There are multiple approaches to providing access to applications via the internet, mobility devices, and also giving third party developers a way of interfacing their software products. Following are the goals we set out to achieve:
We’re pleased to report that we have achieved all the above (and a little more) by building the following into the framework of Ostendo:
So how does it practically work (you’ll need to be running this either from your PC – if you’re in standalone mode, or from the server) – Development-X will be providing some more comprehensive templates over the next few weeks. To see how it works do the following:
Graphical Web Dashboards
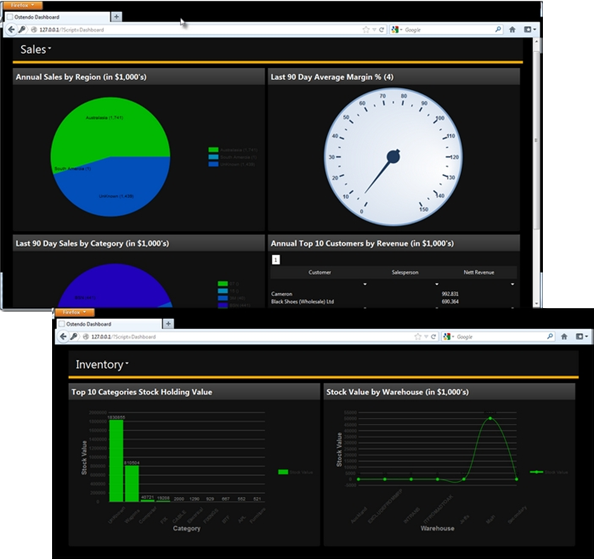
We have added a new module for creating web Dashboards. The idea is that you setup a Dashboard (File-Dashboard Configuration) and then assign that Dashboard(s) to an employee (we use the POS password for logging into the Dashboards). A Dashboard is basically a collection of gauges, charts & grids that provide the user with a graphical snapshot of how the particular part of the business is performing (Key Performance Indicators). To illustrate how these are setup we have included a couple of samples in this update (more help will follow).
To actually run the Dashboard you will require web services, or you can test them in the script editor (there is a new feature that will enable running the web services script in the local browser – without having to have web services running). You will also need to download the new script template that enables the Dashboard to run; to do this, add a new Web Services script in the Script Editor and then click on the ‘Download Online Template’, from which you will be able to select the ‘Dashboard’ template (you will also be prompted to download another dependant script called ‘dashdata’ – just accept that). Once you have installed that script, you’re ready to try it. Go to the ‘Script’ tab and click on ‘Run (local)’. You should be presented with a login screen for employees (remember the password can be defined as a POS password in the Employee screen and you will need to assign the dashboards to each employee). Once logged in you should see something like the following:
Web Inquiries (see also Dashboards)
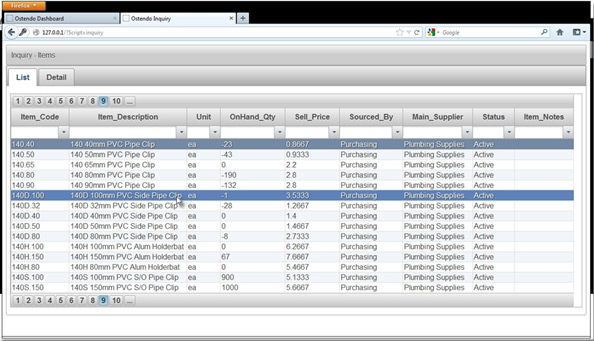
We have developed a web services script that enables simple inquiry screens to be run from any web browser (like the Web Dashboards). The idea here is that you may wish to provide online information to employees remotely (i.e. Open Orders, Outstanding Invoices, Job Information, Stock Availability etc...). The actual inquiry screen is built in the standard ‘Report & View Developer’ and is then assigned to employees (File-Reporting Configuration-Web Inquires).
Like the web Dashboards you will require web services running, or you can test them in the script editor (there is a new feature that will enable a web services script to run in a local browser – without having to have web services running). You will also need to download the new script template that enables the Web Inquiry to run; to do this, add a new Web Services script in the Script Editor and then click on the ‘Download Online Template’, from which you will be able to select the ‘Inquiry’ template (you will also be prompted to download another dependant script called ‘inquirydata’ – just accept that). Once you have installed that script, you’re ready to try it. Go to the ‘Script’ tab and click on ‘Run (local)’ and you should be presented with a login screen for employees (remember the password can be defined as a POS password in the Employee screen and you will need to assign the dashboards to each employee). Once logged in you should see something like the following:
Web Services – Mobile Timesheets
We have added a new Web Services Template called ‘Mobile Timesheets’. This allows employees to capture their timesheet entries remotely via their Smart Phones or Tablets (Designed for Mobile Touch devices). The idea is that the employee logs in (uses POS password in the Employee screen) and then able to enter times against specific Jobs or against Non-Charge cost centres. When the employee logs in there is a check made to determine whether there is an existing Timesheet batch in Ostendo, if not a new one is automatically created (if there is more than one, the latest batch is used – allowing staff back in the office to validate the entries before final posting).
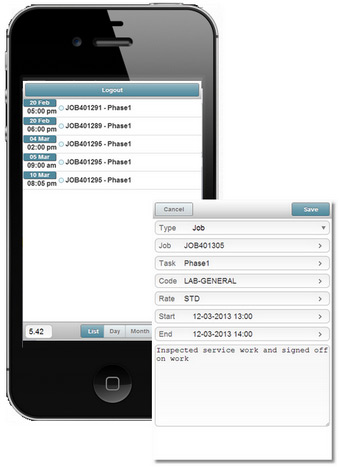
To download this template, create a new Custom Script (File-Scripting Configuration-Script Editor), select ‘Web Service Style’ and click the ‘Download Online Template’ button. A ‘Select a Script Template’ popup window will appear, from which you are able to select the ‘MobileTimesheet’ template. Once downloaded (so long as you have Web Services running) you are able remotely capture readings.
Note: The security for this template is via the Employee and their password (uses the same password as POS). For android devices, ensure you use latest version of Chrome as your mobile browser to run this script.
Web Services – Mobile Meter Readings
We have added a new Web Services Template called ‘Mobile Meter Readings’. This allows employees to capture readings real time for Customer Assets via their Smart Phones or Tablets (Designed for Mobile Touch devices). To download this template, create a new Custom Script (File-Scripting Configuration-Script Editor), select ‘Web Service Style’ and click the ‘Download Online Template’ button. A ‘Select a Script Template’ popup window will appear, from which you are able to select the ‘MobileMeterReadings’ template. Once downloaded (so long as you have Web Services running) you are able remotely capture readings.
Note: The security for this template is via the Employee and their password (uses the same password as POS). For android devices, ensure you use the latest version of Chrome as your mobile browser to run this script.
Web Services – Compression Option
We have added the ability to use HTTP compression in Web Services. This option is set in the File-Scripting Configuration-Scripting Preferences screen.
Web Services – Security Certificates (HTTPS)
We have provided the ability to run all web service scripts using security certificates (HTTPS). This effectively encrypts all data being sent to and from remote browser and Ostendo. You define the SSL Certificate and Key files in the File-Scripting Configuration-Scripting Preferences screen. When starting Ostendo Web Services you will also be required to pass an additional start-up parameter for the port to be used for SSL (i.e. "C:\Program Files\Ostendo\Ostendo.exe" STARTUPID:SAMPLE WEBSERVICE:85 SSLPORT=446 Username=Admin Password=Pass)
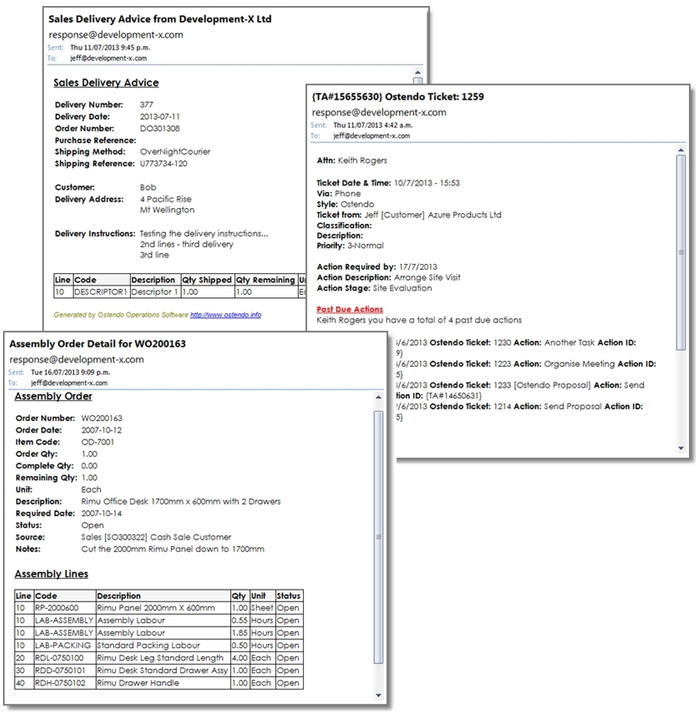
Email Services is an exciting new part of the Ostendo Framework that allows for the following:
Setting up Email Services
Email services uses Queue services to schedule the automatic polling of receiving from, and sending to, email addresses. The first thing to do is setup the defaults for your outgoing and incoming email accounts in the Queue Settings screen (for Incoming emails you’ll able to specific many of these for different purposes i.e. Forwarding Correspondence emails, EDI emails, Request emails):
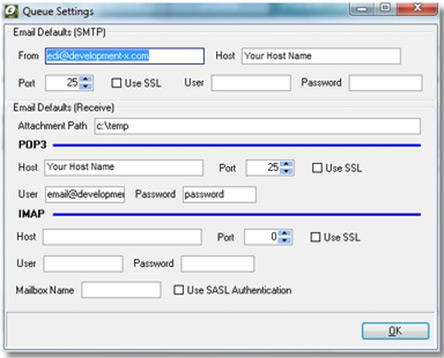
Outgoing Emails
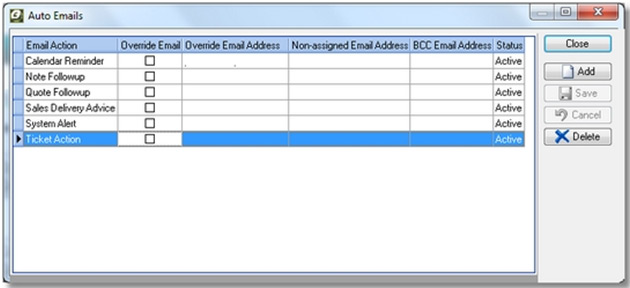
Once you’ve set the defaults up, there 2 more things you’ll need to do; Define what activities you would like to have automatically emailed, and then schedule the Auto Emailing to run at pre-determined intervals.
Step 1: You’re able to add one or more off the following 6 activities to be automatically emailed (Calendar Reminders, Ticket Actions, History Note Follow-ups, Quote Follow-ups, System Alerts (Individual Alerts are also flagged as requiring emailing), Sales Delivery Advice Notifications). For each you have the ability to set an override for the email address they’re sent to, a default email address if the activity doesn’t have an email to send to (i.e. For Quotes follow-ups the Sales Persons email is used therefore if there is no Salesperson or that employee doesn’t have an email address then the Non-Assigned Email Address will be used), a BCC email address, and lastly whether this record is active.
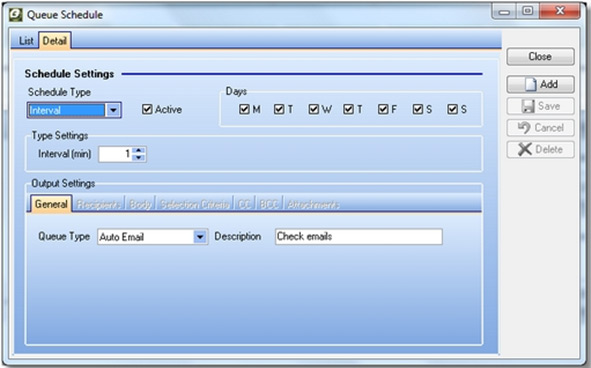
Step 2: Now you’ll need to define a Queue Schedule record for the frequency you wish to send the emails out (via the Queue Schedule screen):
Incoming Emails
Receiving incoming emails is automated via the Queue Schedule, we have added the ability to receive from either POP3 or IMAP accounts and then automatically log those emails in a table within Ostendo (table is called EMAILLOG). Any attachments are also stored based on the attachment path defined in the Queue Settings (and can be further segregated via a sub folder name as defined in the schedule record). The receiving of emails can be split into 3 different types:
There are 2 things you’ll need to do to get the incoming emails running:
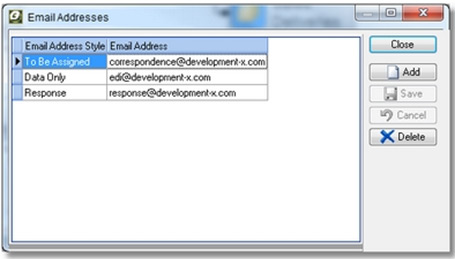
Step 1: You’re able to add one or more off the following 3 email types (To Be Assigned, Data Only, Response). For each of these you enter a linked email address (you’re able to have multiple email addresses for each type).
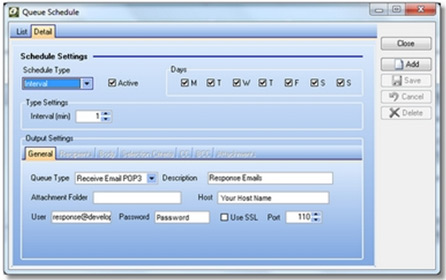
Step 2: Now you’ll need to define a Queue Schedule record for the frequency you wish to receive from each of the email accounts.
Using Email Services
Once you have setup email services (and you have Queue Services running) you’re able to start using a number of features immediately (The ability to run a Query and Request / Process a Form requires some more setup – explained later in this paper).
Response Emails:
Following are instructions on how to interact with the Ostendo Response Emails (theses are also available by typing in ‘Help’ in the email subject line and emailing to the email address you’ve setup for that type (i.e. response@development-x.com). You’ll then receive a reply from Ostendo with the following instructions – useful for employees out in the field.
Responding to Quote or Note Follow-ups, Calendar Reminders and Ticket Actions
When you receive an email with an Action, Follow-up, Reminder or Action from Ostendo, you are able to let the system know that you have actioned this by replying to the email and appending the word DONE to the beginning of the email subject (i.e. you may receive an email to remind you to follow-up on a specific Sales Quote. The subject of the email would read something like: {SQ#14661936} Ostendo Quote Follow Up for Customer: [XYZ Limited] Quote No: [S301306])
So when replying to Ostendo to indicate you have followed up, you simply append DONE to the beginning of the Subject making sure you have included a space between the word DONE and the rest of the subject (i.e. DONE {SQ#14661936} Ostendo Quote Follow Up for Customer: [XYZ Limited] Quote No: [S301306])
If action notes are required when completing an action, they can be added into the body of the reply, terminated by typing the character ']' twice (i.e. ]])
Sending and Adding Files and History Notes to Jobs, Sales and Tickets
You're able to email files (i.e. Photos, PDFs, etc...) by simply attaching the file to an email and formatting the email subject based on the following.
The subject needs to start with the word FILE (followed by a space) and then followed by either JOB, SALES or TICKET with the character # (hash) either side of the Order Number or Ticket ID (i.e. FILE JOB#125000#).
If notes are required for the linked file they can be added into the body of the reply, terminated by typing the character ']' twice (i.e. ]])
You're also able to email notes (History Notes) by simply attaching the file to an email and formatting the email subject based on the following.
The subject needs to start with the word NOTE (followed by a space) and then followed by either JOB, SALES or TICKET with the character # (hash) either side of the Order Number or Ticket ID (i.e. NOTE TICKET#78990#) The actual History Note is added into the body of the reply, terminated by typing the character ']' twice (i.e. ]])
Running a Query and returning the Results as an Email
You're able to run a pre-designed Query and have the results automatically formatted and returned within the body of the email.
The subject needs to start with the word QUERY (followed by a space) and then followed by the pre-defined Query name with the character # (hash) either side of the Key Value (i.e. QUERY JobInfo#125000#)
Requesting a Form (Spreadsheet)
You're able request a pre-formatted Form (Spreadsheet) and have that automatically emailed back with specific cells pre-filled if defined that way.
The subject needs to start with the word REQUEST (followed by a space) and then followed by the pre-defined Form name
with an optional character # (hash) either side of the Key Value (only if needed) (i.e. REQUEST ServiceSheet#125000#)
Processing a Form (Spreadsheet)
You're able attach a pre-formatted Form (Spreadsheet) and have the data automatically inserted into Ostendo.
The subject needs to start with the word PROCESS (followed by a space) and then followed by the pre-defined Form name (i.e. PROCESS ServiceSheet)
Data Only Emails:
This type of email is for receiving emails designed to contain data, like EDI gateways with external companies, Orders and Payments from E-Commerce sites and data being sent from a remote site for synchronisation. These applications require a specific script written that will process the data accordingly.
To Be Assigned Emails:
This type of email is for forwarding Correspondence emails from individual email clients to be either automatically assigned to Customer and/or Suppliers via the originating email address, or manually assigned within the Operations Centre. Typically where the user is not using Outlook or doesn’t wish to use the Outlook add-in.
Email Queries
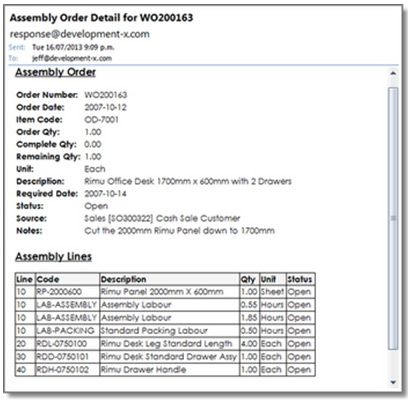
An Email Query provides the ability for employees to request a pre-defined query to be run and retuned via email (in an HTML format). The queries are defined in the ‘File-Email Services-Email Queries’ screen and can only be requested by active employees (checks their email address).
Formatting of the Query Results
The resultant Query when returned as an email is automatically formatted to suit the fields and records returned. You do however have the option of inserting either a blank line or horizontal line for header fields by including the following in your SQL statement:
Email Forms
Email Forms is a component of the Ostendo Email Services. The purpose of Email Forms is to automatically process spreadsheet (.xls) forms sent in by users.
Email Forms can be used in a variety of ways. For example:
How it Works
Ostendo Email Forms consists of the following pieces:
The Spreadsheet Forms:
Out of the box, Ostendo comes with a few basic Email Forms (these spreadsheets are protected by default – the password to unprotect is ‘ostendo’). These forms serve as samples and can be modified by users to meet their specific requirements. Apart from a couple of basic rules, users can decide how they want to layout their forms. They can even build in data validation rules, protect certain fields and so on.
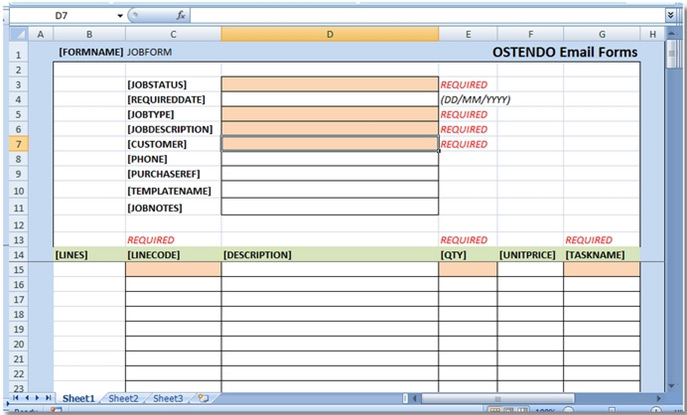
Forms consist of Field Names and Values.
There are two types of fields – Fixed Fields and Multiline Fields. In order to differentiate between these two types of fields, and between field names and values, the following rules must be strictly followed:
As an example, take a look at the following JOBFORM:
Email Forms Process Flow:
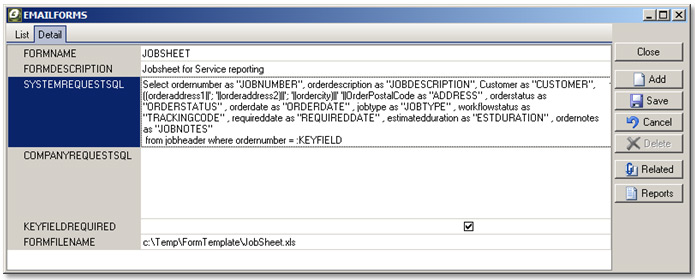
The Email Forms screen is used primarily to identify forms which are requested by users with a requirement to pre-fill with data from header records before being emailed to the requestor.
The SQL extracts all the required data and the field names must match exactly those defined in the form. There needs to be a parameter for the KEYFIELD in the condition of the SQL (i.e. ‘where ordernumber = :KEYFIELD’)
The FormFileName specifies where the blank form is kept. Ostendo makes a copy of the blank form, fills it with the extracted data and emails it to the user.
Whenever a form is emailed to Ostendo, it is logged in the EMAILLOG table either as a PROCESS or REQUEST.
A PROCESS form is already filled with data that needs to be processed by Ostendo (for example to create a new customer record or Job Quote, etc.).
A REQUEST is basically to request for a spreadsheet form from Ostendo and usually involves pre-filling with some header data from the database.
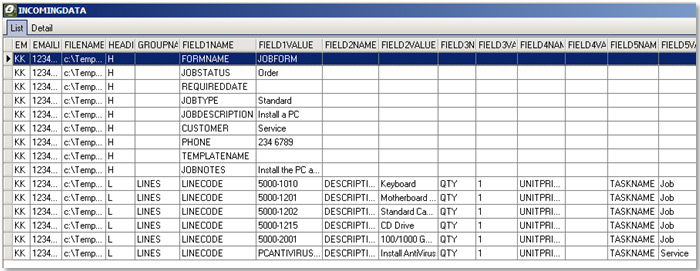
The INCOMINGDATA table is used to temporarily hold the spreadsheet data for easier processing.
The scripting function ProcessIncomingData scans the spreadsheet, identifies the Fixed Field Names and values and store them as (H) records – one Fixed Field name and value per record. Multiline Column Names and Values are stored as (L) records – each record holds one line of data (i.e. multiple fieldname + value pairs together with the Group name.
The Email Subject Parameters:
When sending a form to be processed, the email subject line must be as follows:
Subject: PROCESS formname
• where formname is the name of the form used in the attached spreadsheet.
When sending a form as a request, the email subject line must be as follows:
Subject: REQUEST formname#keyvalue#
• where formname is as above and keyvalue is the value of the keyfield used in the SQL associated with this form. In this case the form name and the keyvalue must be terminated by the ‘#’ character.
The Scripts:
Two scripts are provided to handle the basic forms provided with Ostendo. This scripts can be modified to suit the users’ needs if required.
The EForms-PROCESS script scans the EMAILLOG for records relating to PROCESS forms. It extracts the data into the INCOMINGDATA table and then process the data as required for each form.
The EForms-REQUEST script scans the EMAILLOG for records relating to REQUESTs, fetches the form from the location specified in the EMAILFORMS table, calls the PopulateSpreadSheetData function to fill the spreadsheet with the required data as per the SQL specified in EMAILFORMS and sends it off to the requestor.
Error Correction:
If there are errors in the forms that are sent in to be PROCESSed, then the EForms-PROCESS script will flag the error(s) in the INCOMINGDATA table.
Someone needs to be designated to review the error batches in INCOMINGDATA table via the screen ‘File-Email Services-Email Form Errors’, and make the required corrections and untick the ‘In Error’ flag.
Once the records are corrected, all the records relating to the form will be processed again the next time EForms-PROCESS is run. There is no need to make changes to the spreadsheet form as only the INCOMINGDATA records will be processed again after correction.
Tablets - Customised Data Entry Screens
Please Note:- Customised Data Entry Screens can be run on Microsoft Windows Tablets for Remote Data Entry in the field, then synchronised back to Ostendo at a later time using Queue Services.
We have significantly enhanced the Edit View developer to allow for drag & drop forms design (new Style called ‘Custom Entry’), and have provided the ability to capture signatures, freehand drawings, and digital photos. There are numerous uses for this feature – here are a few examples:
The screen shot below is a simple example of a Service Sheet designed to allow job information to be captured in a user defined table (including 2 signatures, a freehand drawing, and some digital photos which are all stored within the database).
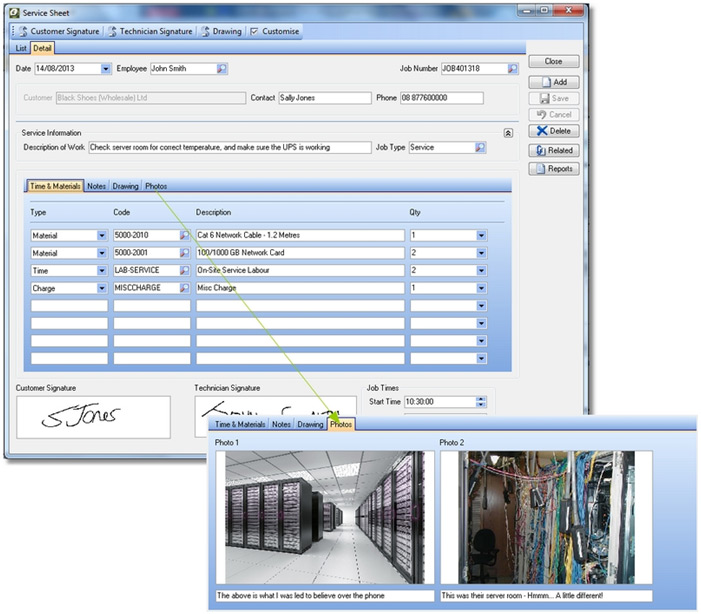
This would run on a remote windows tablet, and then be electronically sent back to the office when the internet was available, so it could then be invoiced out.
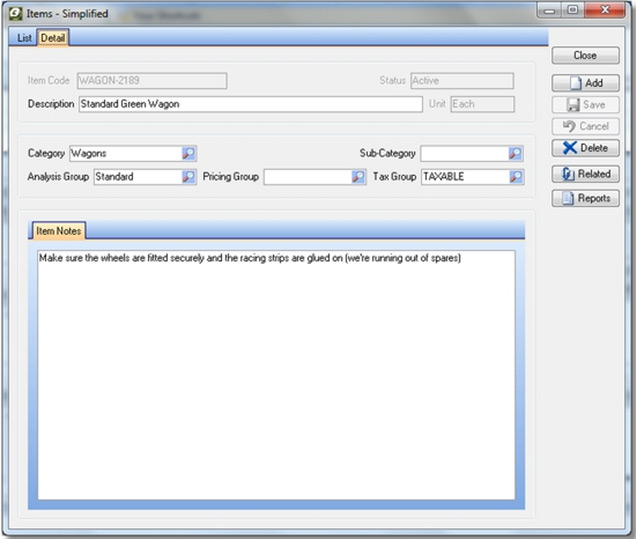
Following is an example of a Simplified Item screen that could used for specific users in organisation that only had rights to modify a handful of fields:
Mobile Timesheets
Mobile Timesheets is a new Web Services Template. This allows employees to capture their timesheet entries remotely via their Smart Phones or Tablets (Designed for Mobile Touch devices). The idea is that the employee logs in (uses POS password in the Employee screen) and then able to enter times against specific Jobs or against Non-Charge cost centres. When the employee logs in there is a check made to determine whether there is an existing Timesheet batch in Ostendo, if not a new one is automatically created (if there is more than one, the latest batch is used – allowing staff back in the office to validate the entries before final posting).

To download this template, create a new Custom Script (File-Scripting Configuration-Script Editor), select ‘Web Service Style’ and click the ‘Download Online Template’ button. A ‘Select a Script Template’ popup window will appear, from which you are able to select the ‘MobileTimesheet’ template. Once downloaded (so long as you have Web Services running) you are able remotely capture readings.
Note: The security for this template is via the Employee and their password (uses the same password as POS). For android devices, ensure you use latest version of Chrome as your mobile browser to run this script.
Mobile Meter Readings
Mobile Meter Readings is a new Web Services Template. This allows employees to capture readings real time for Customer Assets via their Smart Phones or Tablets (Designed for Mobile Touch devices). To download this template, create a new Custom Script (File-Scripting Configuration-Script Editor), select ‘Web Service Style’ and click the ‘Download Online Template’ button. A ‘Select a Script Template’ popup window will appear, from which you are able to select the ‘MobileMeterReadings’ template. Once downloaded (so long as you have Web Services running) you are able remotely capture readings.
Note: The security for this template is via the Employee and their password (uses the same password as POS). For android devices, ensure you use the latest version of Chrome as your mobile browser to run this script.