|
|
|
|
Ostendo Update Notes from August 2013There are 4 significant areas either added or updated that merit further explanation.
Operations Centre Overview
The Operations Centre (found in the CRM module) is a new screen designed to pull together activities and emails that have occurred within Ostendo or emails that have been assigned to Customers, Suppliers or activities via the email add-in (forwarded or BCCed) . Think of the Operations Centre as an Operational Portal to business information, Key Performance Indicators and Statistics. The idea behind this new screen was to allow the user to view activities, based on the premise that an entity or module was the centre of the universe, in other words, if I was dealing with a Customer I would want to know everything about that Customer, and be able to transact their common requests or actions. We also considered that it was important to understand the key measures and statistics that pertained to what was being looked at. Options Available in the Operations Centre The main Operations Centre screen is divided into 3 major panels: Conditions & New Activities Bars
New Activities Toolbar: The first toolbar provides the ability to create new activities based on the Type that has been selected in the Type dropdown (Customer, Supplier, Customer Asset, Manufacturing, Sales, Jobs, Purchasing, Un-Assigned Emails and To Do). As an example, if you’d selected ‘Customer’ you’d be able to such activities as: (Sales Orders, Job Orders, Emails, Call Tickets, Payments etc...) Conditions Toolbar: The second toolbar provides the ability to condition what appears in the Activity List and Preview panels. The options are:
Types Activity Panel
List Tab: The Activity List is the hub of the screen, and displays the activities determined via the Conditions Toolbar. Each Activity can optionally be colour coded to make for ease of recognition (set in the CRM-Settings-OC Activities screen). There are 14 columns in the list which display key information about the activity (i.e. Date, ID, Status, Style, Value, Balance, Due Date, etc...). The actual value linked to that column will depend on the Activity Type. Under each Activity Type record there is a description (in Blue Italics) which provides for more information about that activity and what it might relate to. Priority Notes Toolbar: You’ll notice in the above screen shot, that there is a toolbar displaying a Red Alarm clock icon, with the caption ‘IMPORTANT:’ just to the right of it. This will only display if there are priority notes flagged against the Type selected. Against History Notes you are now able to flag the note as priority (this can also be done via the right click menu when you’re on a note). This priority note feature is designed for where there might be something important to remember next time say you’re talking to a customer or supplier.
Filter Condition Bar: Like used elsewhere in the system you’re able to define conditions and link them to a button that in toolbar at the top of the Activity List, enabling a user to narrow down what appears. This is ideal for presenting information based on different roles in an organisation (i.e. as a credit controller you may wish to only see only outstanding invoices, unapplied payments, unapplied deposits, and any notes or emails for each invoice – this is actually one of the standard filter buttons for Customers).
Balance Bar: This only displays if the Type = ‘Customer’ and shows the Outstanding customers balance, any unapplied payments or deposits, and the outstanding balances aged according to the aging period definition in the ‘File-Financial Configuration-Aging Periods’. Each of the captions to the left of the values can be clicked on/off which then filters the Activity List displaying only transactions that relate to that period (i.e. you may wish to view only invoices that are more than 60 days). At the end of the Balance Bar there is a button ‘Statements’ that, when clicked on will generate a Customer Statement for Customer currently selected.
Please Note: The date range in the Conditions panel will be adjusted if necessary to display the outstanding invoices, payments or deposits
Right Click Menu (from with the Activity List): This menu displays after right clicking on the Activity List (the ‘Set Priority to True / False’ is only available when on a Note). Actions are as follows:
KPI Tab: This tab displays Key Performance Indicators (KPI’s) that pertain to the Type and name selected in the Conditions Panel. In other words if you’ve selected a Customer, then the KPI’s will relate to that customer. You’ll notice there is a drill down grid to the right of the main KPI grid, this displays information that makes up that KPI value. The definition of these KPI’s can be found in the CRM-Settings-OC KPIS screen. KPI percentages can also be colour coded based on their value (is defined in the ‘CRM-Settings-OC KPI Indicators’ screen). Statistics Tab: This tab displays Statistics that pertain to the Type and name selected in the Conditions Panel. In other words if you’ve selected a Customer, then the Statistics will relate to that customer. There is optionally a drill down grid to the right of the main Statistic grid (depend on whether it has been defined), this displays information that makes up that Statistic value. The definition of these Statistics can be found in the CRM-Settings-OC Statistics screen. Info Tab: This tab displays general information about the Type and name selected in the Conditions Panel. In other words if you’ve selected a Customer then you may wish to display address and contact details. The definition of this is in the CRM-Settings-OC Rules screen. Preview Panel
This panel dispalys theat least 2 of the following tabs (dependant on the Activity Type selected):
To Do This is one of the Types available in the Conditions panel and displays any Calendar Reminders, History Note Follow-ups, Outstanding Ticket Actions and Quote Follow-ups that relate to the user logged into the Ostendo. Where there is an Employee linked to the event (i.e. Ticket Actions), the ‘Default User for Reminders’ held against that Employee is used for this display. Right Click Menu (from with the Activity List when in ‘To Do’): This menu displays after right clicking on the Activity List. The primary option for ‘To Do’ activities is ‘Update to Actioned’ – this flags the Calendar Reminder, History Note Follow-up, Quote Follow-up or Ticket Action has being completed. Outlook Add-In
We have developed a Microsoft Outlook add-in that will allow the user from with Outlook Assign and Un-Assign emails to one of the following (The add-in will attempt to automatically assign based on the senders address, but you’ll still be required to click on the assign option) :
For this functionality to work you’ll need Ostendo Web Services running and have downloaded the Web Services script called ‘outlookdata’ via the ‘Download Online Template’. Please make sure you have the latest version for this new version (use the ‘Check for an Update of this Template’ in the Script Editor)
Installing the Add-In Please Note: This has changed from the previous install - To install the MS Outlook Add-In we have provided a simple installation executable (called ‘OutlookAddIn.exe’ – which can be found in the Ostendo directory). This, will both Install, and Un-install the Outlook Add-in. There is also an INI file called ‘ostoladdin.ini’ which is installed and will need to be configured. You are able to specify the IP address for your web server, the directory for linked attachments and embedded images, and the number of characters you type before the search dropdown list is activated in the outlook add-in (narrows down the records in the list). A generic script (where Outlook is not the email client e.g. GMail) will also be supplied for the commercial release which will allow emails to be forwarded or BCCed to a predefined email address where the queue service will then automatically bring them into Ostendo (attempting to auto assign based on the sender address). User Security
You’re able to exclude Activity Types, KPI’s Statistics and Activity Descriptions in the ‘Operations Centre Exclusions’ within the ‘System Configuration-User Security & Options’ screen. Like the standard user security, you are able to inherit these rights if the user has been setup to Inherit Security from another user. Call Centre OverviewThe Call Centre (found in the CRM module) has been revised to allow for multiple actions per ticket, linked Styles, Pipelines, Graphical Timeline view, Linked History Notes and Tracking Codes.
Call Style The Call Style determines the style of Ticket (i.e. Opportunity, Customer Claim, Capital Approval, etc...). Against the Call Style (CRM-Settings-Call Styles) you’re able to define the following:
Action Information
We have now added the ability to include multiple actions for a single Ticket. Each action can have the following fields:
Timeline
This displays a graphical view of the Stages (Milestones), Actions and Ticket Required Date. You’ll notice that the Stages and Ticket Required Date is above the Timeline, and the individual Actions are below the Timeline. Each Stage can be colour coded (CRM-Settings-Pipeline Stages) and Actions that are linked to that Stage have a colour coded triangular indicator. If an Action is completed there is a checkbox that displays just to the left of the Action Description – see image:
Email Services Overview
Email Services is an exciting new part of the Ostendo Framework that allows for the following:
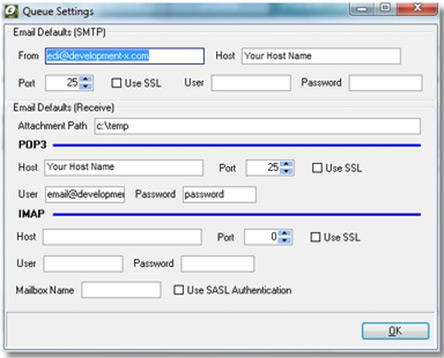
Setting up Email Services Email services uses Queue services to schedule the automatic polling of receiving from, and sending to, email addresses. The first thing to do is setup the defaults for your outgoing and incoming email accounts in the Queue Settings screen (for Incoming emails you’ll able to specific many of these for different purposes i.e. Forwarding Correspondence emails, EDI emails, Request emails):
Outgoing Emails Once you’ve set the defaults up, there 2 more things you’ll need to do; Define what activities you would like to have automatically emailed, and then schedule the Auto Emailing to run at pre-determined intervals.
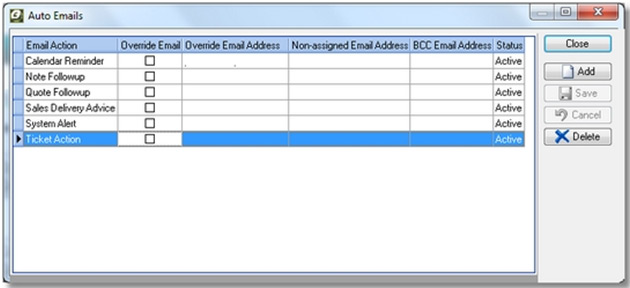
Step 1: You’re able to add one or more off the following 6 activities to be automatically emailed (Calendar Reminders, Ticket Actions, History Note Follow-ups, Quote Follow-ups, System Alerts (Individual Alerts are also flagged as requiring emailing), Sales Delivery Advice Notifications). For each you have the ability to set an override for the email address they’re sent to, a default email address if the activity doesn’t have an email to send to (i.e. For Quotes follow-ups the Sales Persons email is used therefore if there is no Salesperson or that employee doesn’t have an email address then the Non-Assigned Email Address will be used), a BCC email address, and lastly whether this record is active.
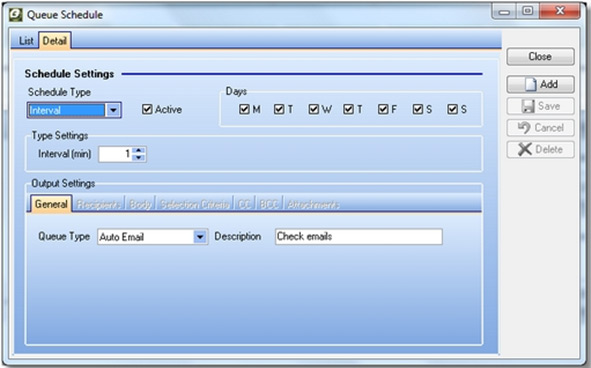
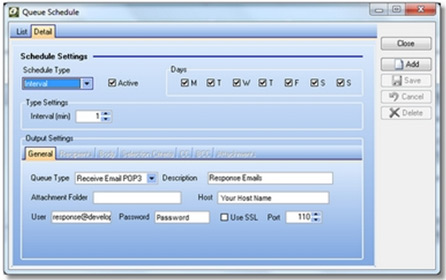
Step 2: Now you’ll need to define a Queue Schedule record for the frequency you wish to send the emails out (via the Queue Schedule screen):
Incoming Emails Receiving incoming emails is automated via the Queue Schedule, we have added the ability to receive from either POP3 or IMAP accounts and then automatically log those emails in a table within Ostendo (table is called EMAILLOG). Any attachments are also stored based on the attachment path defined in the Queue Settings (and can be further segregated via a sub folder name as defined in the schedule record). The receiving of emails can be split into 3 different types:
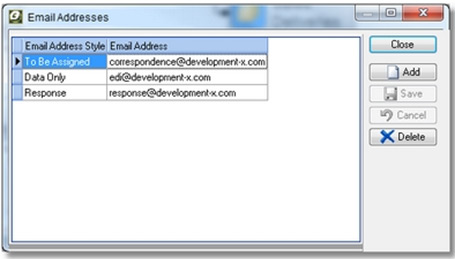
There are 2 things you’ll need to do to get the incoming emails running: Step 1: You’re able to add one or more off the following 3 email types (To Be Assigned, Data Only, Response). For each of these you enter a linked email address (you’re able to have multiple email addresses for each type).
Step 2: Now you’ll need to define a Queue Schedule record for the frequency you wish to receive from each of the email accounts.
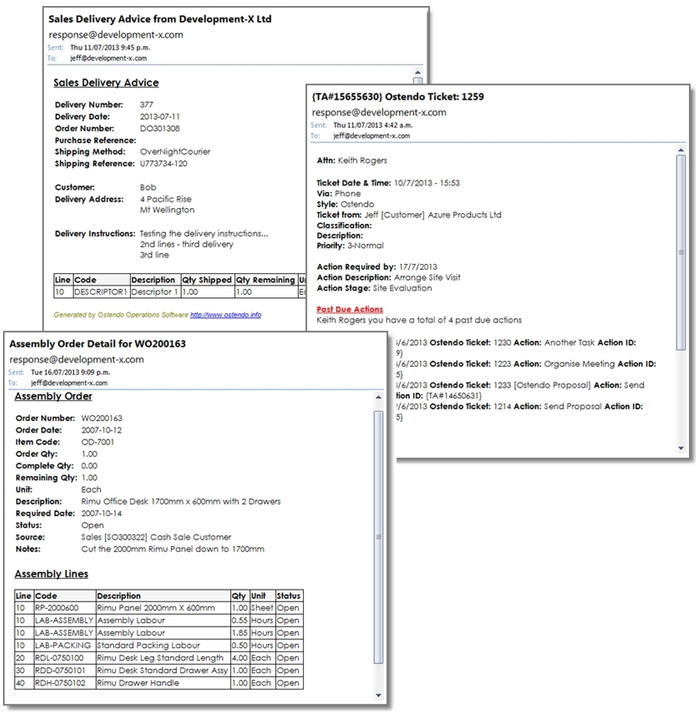
Using Email Services Once you have setup email services (and you have Queue Services running) you’re able to start using a number of features immediately (The ability to run a Query and Request / Process a Form requires some more setup – explained later in this paper). Response Emails: Following are instructions on how to interact with the Ostendo Response Emails (theses are also available by typing in ‘Help’ in the email subject line and emailing to the email address you’ve setup for that type (i.e. response@development-x.com). You’ll then receive a reply from Ostendo with the following instructions – useful for employees out in the field. Responding to Quote or Note Follow-ups, Calendar Reminders and Ticket Actions When you receive an email with an Action, Follow-up, Reminder or Action from Ostendo, you are able to let the system know that you have actioned this by replying to the email and appending the word DONE to the beginning of the email subject (i.e. you may receive an email to remind you to follow-up on a specific Sales Quote. The subject of the email would read something like: {SQ#14661936} Ostendo Quote Follow Up for Customer: [XYZ Limited] Quote No: [S301306]) So when replying to Ostendo to indicate you have followed up, you simply append DONE to the beginning of the Subject making sure you have included a space between the word DONE and the rest of the subject (i.e. DONE {SQ#14661936} Ostendo Quote Follow Up for Customer: [XYZ Limited] Quote No: [S301306]) If action notes are required when completing an action, they can be added into the body of the reply, terminated by typing the character ']' twice (i.e. ]]) Sending and Adding Files and History Notes to Jobs, Sales and Tickets You're able to email files (i.e. Photos, PDFs, etc...) by simply attaching the file to an email and formatting the email subject based on the following. The subject needs to start with the word FILE (followed by a space) and then followed by either JOB, SALES or TICKET with the character # (hash) either side of the Order Number or Ticket ID (i.e. FILE JOB#125000#). If notes are required for the linked file they can be added into the body of the reply, terminated by typing the character ']' twice (i.e. ]]) You're also able to email notes (History Notes) by simply attaching the file to an email and formatting the email subject based on the following. The subject needs to start with the word NOTE (followed by a space) and then followed by either JOB, SALES or TICKET with the character # (hash) either side of the Order Number or Ticket ID (i.e. NOTE TICKET#78990#)The actual History Note is added into the body of the reply, terminated by typing the character ']' twice (i.e. ]]) Running a Query and returning the Results as an Email You're able to run a pre-designed Query and have the results automatically formatted and returned within the body of the email. The subject needs to start with the word QUERY (followed by a space) and then followed by the pre-defined Query name with the character # (hash) either side of the Key Value (i.e. QUERY JobInfo#125000#) Requesting a Form (Spreadsheet) You're able request a pre-formatted Form (Spreadsheet) and have that automatically emailed back with specific cells pre-filled if defined that way. The subject needs to start with the word REQUEST (followed by a space) and then followed by the pre-defined Form name with an optional character # (hash) either side of the Key Value (only if needed) (i.e. REQUEST ServiceSheet#125000#) Processing a Form (Spreadsheet) You're able attach a pre-formatted Form (Spreadsheet) and have the data automatically inserted into Ostendo. The subject needs to start with the word PROCESS (followed by a space) and then followed by the pre-defined Form name (i.e. PROCESS ServiceSheet) Data Only Emails: This type of email is for receiving emails designed to contain data, like EDI gateways with external companies, Orders and Payments from E-Commerce sites and data being sent from a remote site for synchronisation. These applications require a specific script written that will process the data accordingly. To Be Assigned Emails:
This type of email is for forwarding Correspondence emails from individual email clients to be either automatically assigned to Customer and/or Suppliers via the originating email address, or manually assigned within the Operations Centre. Typically where the user is not using Outlook or doesn’t wish to use the Outlook add-in. Email Queries An Email Query provides the ability for employees to request a pre-defined query to be run and retuned via email (in an HTML format). The queries are defined in the ‘File-Email Services-Email Queries’ screen and can only be requested by active employees (checks their email address).
Email Forms Email Forms is a component of the Ostendo Email Services. The purpose of Email Forms is to automatically process spreadsheet (.xls) forms sent in by users. Email Forms can be used in a variety of ways. For example:
How it Works Ostendo Email Forms consists of the following pieces:
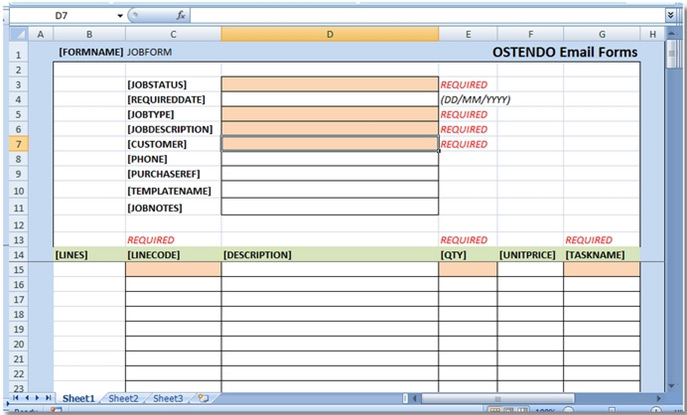
The Spreadsheet Forms: Out of the box, Ostendo comes with a few basic Email Forms (these spreadsheets are protected by default – the password to unprotect is ‘ostendo’). These forms serve as samples and can be modified by users to meet their specific requirements. Apart from a couple of basic rules, users can decide how they want to layout their forms. They can even build in data validation rules, protect certain fields and so on. Forms consist of Field Names and Values. There are two types of fields – Fixed Fields and Multiline Fields. In order to differentiate between these two types of fields, and between field names and values, the following rules must be strictly followed:
As an example, take a look at the following JOBFORM:
Email Forms Process Flow:
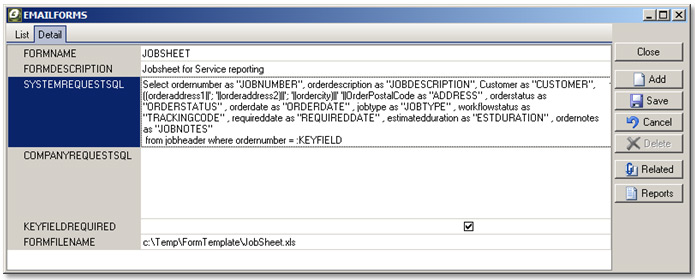
The Email Forms screen is used primarily to identify forms which are requested by users with a requirement to pre-fill with data from header records before being emailed to the requestor. The SQL extracts all the required data and the field names must match exactly those defined in the form. There needs to be a parameter for the KEYFIELD in the condition of the SQL (i.e. ‘where ordernumber = :KEYFIELD’) The FormFileName specifies where the blank form is kept. Ostendo makes a copy of the blank form, fills it with the extracted data and emails it to the user. Whenever a form is emailed to Ostendo, it is logged in the EMAILLOG table either as a PROCESS or REQUEST. A PROCESS form is already filled with data that needs to be processed by Ostendo (for example to create a new customer record or Job Quote, etc.). A REQUEST is basically to request for a spreadsheet form from Ostendo and usually involves pre-filling with some header data from the database.
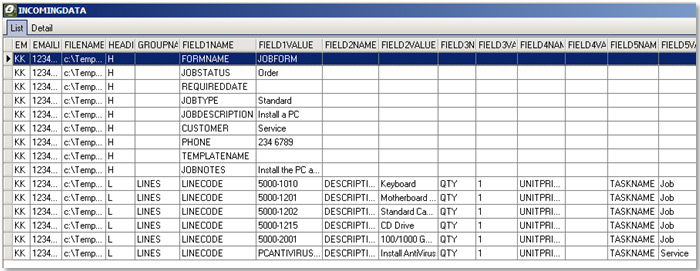
The INCOMINGDATA table is used to temporarily hold the spreadsheet data for easier processing. The scripting function ProcessIncomingData scans the spreadsheet, identifies the Fixed Field Names and values and store them as (H) records – one Fixed Field name and value per record. Multiline Column Names and Values are stored as (L) records – each record holds one line of data (i.e. multiple fieldname + value pairs together with the Group name. The Email Subject Parameters: When sending a form to be processed, the email subject line must be as follows: Subject: PROCESS formname
When sending a form as a request, the email subject line must be as follows: Subject: REQUEST formname#keyvalue#
The Scripts: Two scripts are provided to handle the basic forms provided with Ostendo. This scripts can be modified to suit the users’ needs if required. The EForms-PROCESS script scans the EMAILLOG for records relating to PROCESS forms. It extracts the data into the INCOMINGDATA table and then process the data as required for each form. The EForms-REQUEST script scans the EMAILLOG for records relating to REQUESTs, fetches the form from the location specified in the EMAILFORMS table, calls the PopulateSpreadSheetData function to fill the spreadsheet with the required data as per the SQL specified in EMAILFORMS and sends it off to the requestor. Error Correction: If there are errors in the forms that are sent in to be PROCESSed, then the EForms-PROCESS script will flag the error(s) in the INCOMINGDATA table. Someone needs to be designated to review the error batches in INCOMINGDATA table via the screen ‘File-Email Services-Email Form Errors’, and make the required corrections and untick the ‘In Error’ flag. Once the records are corrected, all the records relating to the form will be processed again the next time EForms-PROCESS is run. There is no need to make changes to the spreadsheet form as only the INCOMINGDATA records will be processed again after correction. Customised Data Entry ScreensWe have significantly enhanced the Edit View developer to allow for drag & drop forms design (new Style called ‘Custom Entry’), and have provided the ability to capture signatures, freehand drawings, and digital photos. There are numerous uses for this feature – here are a few examples:
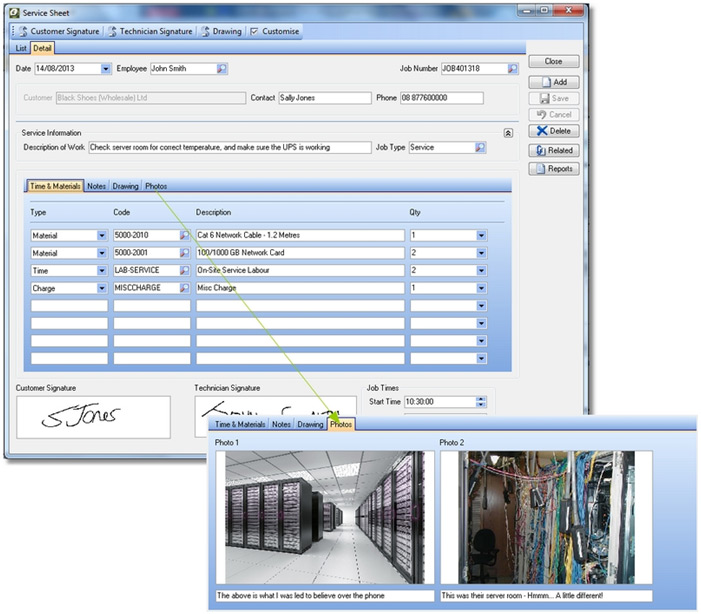
The screen shot below is a simple example of a Service Sheet designed to allow job information to be captured in a user defined table (including 2 signatures, a freehand drawing, and some digital photos which are all stored within the database).
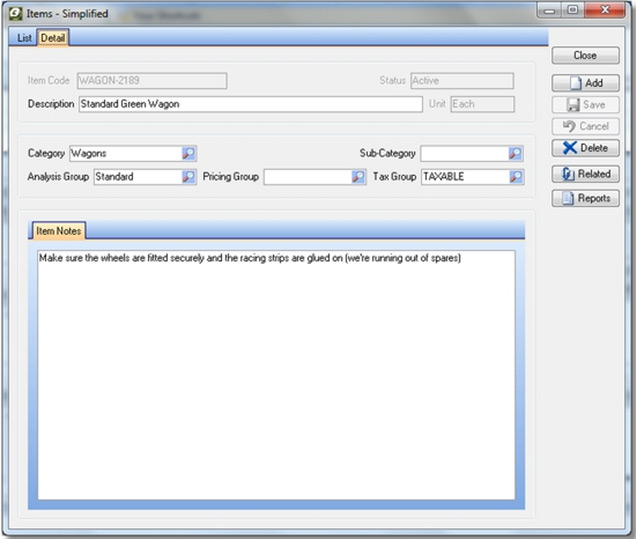
This would run on a remote windows tablet, and then be electronically sent back to the office when the internet was available, so it could then be invoiced out. Following is an example of a Simplified Item screen that could used for specific users in organisation that only had rights to modify a handful of fields:
Additional EnhancementsUser Security
System Alerts
Payment Methods
Customers Messaging
Supplier Messaging
Sales Deliveries – Changing Picked Qty’s, Serial Numbers etc
Sales Rules
Job Rules
Ostendo® adds advanced inventory, job costing, manufacturing, service and distribution to your accounting system.
|


